Trace: • creating-action
Chapter: Creating a first simple action
| « Creating an application and a module | Configuration of the database » |
Table of Contents
A little bit of theory 
An action is a fundamental element of the framework. Every display, every form processing, every web service call is an action.
An action is called through a request which has a defined type and generates a specific response, in a specific format, which can be linked to the type of the actual request.
There are several types of requests, notably the type which is named “classic” in Jelix , for which an action can provide a response in an unspecified format: HTML, XML etc. You will use generally this type of request for almost of your actions. “classic” request provides its parameters in the URL or the body of HTTP request (POST method).
You have also the xmlrpc type requests (used for some web services). In XML-RPC, the input data are not URL parameters, but are stored in a XML content. As XML-RPC protocol wants it, an action defined for this type of request must obligatorily provide a response to XML-RPC format.
Knowing the type of request processed and the action, Jelix knows the type of the answer to be generated, and thus controls more or less the response generation. Thus, even the error case (an exception or other) occurring during the processing of the action, the exit format will always be the awaited one. A client who calls a web service with xmlrpc, will thus have no matter what happens, a response in the xmlrpc format. That brings a certain robustness to the application.
Here is how Jelix work:
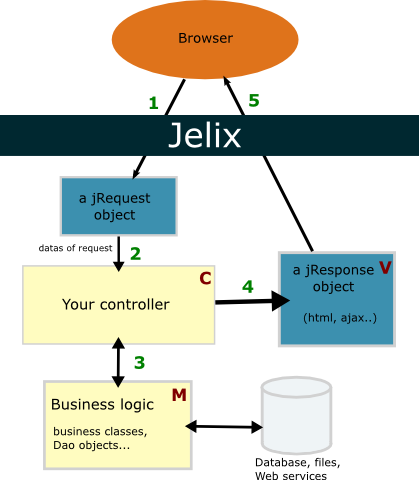
- an HTTP request calls Jelix. Jelix creates an instance of a jRequest object which contains datas of the request. It then create an instance of your controller which corresponds to the asked action.
- A method in the controller is executed. It retrieves request parameters in order to know which process to run.
- Then the method execute business processes, and retrieves eventually some results which will be used for the response
- The method of the controller create an instance of a jResponse object which is setup with datas or else (initialization of templates etc..).
- Jelix gets this jResponse object, launch the generation of the final document (html page, pdf..) and then send the result to the browser.
Implementing an action 
The actions are implemented in so-called controllers. Controllers are classes containing methods for each action. Controllers are placed in files :
controllers///controller_name//.//request_type//.php.
In general, there is an index() method for the default action.
Let's modify this default action. For this, open the new.org/modules/news/contollers/default.classic.php. You should have this content:
class defaultCtrl extends jController {

   function index () {
      $rep = $this->getResponse('html');

      return $rep;
   }
}
You see there are some naming conventions. Controller classes have a name, here “default”, followed by a “Ctrl” suffix. The name is also indicated in the action parameter, and as a prefix in the file name.
Response object 
In the index() method, we retrieve an “html” response into the $rep
variable. Since we specified that the response is the HTML type, you actually
get a jResponseHtml object (extending jResponse). You will see later that there
are other types of responses, and that you can produce your own response
objects.
The jResponseHtml object handles the generation of a HTML response (ie an
HTML page). It generates automatically the <head> part of HTML, from some of its
properties. For example, let's specify the title of the page :
$rep->title = 'Last news';
And the browser will receive :
<head>
   <title>Last news</title>
</head>
All the body of the page, i.e the content of the html tag <body>, must be
generated by yourself, eventually through the Jelix template engine :
jTpl. jResponseHtml
instantiates by default a template engine, in the $body property. The name of
the template file is placed in the $bodyTpl property.
A custom response object 
In each action, you should retrieve a response object, and set to it a title, some js or css files, the main template, set the header etc. You have to do things that you'll have to repeat at each action. Hopefully, because of the OOP, you can create a response object in which all things in common with all actions could be set.
In fact, the create-jelix-app script already creates a such “common”
response object, into app/responses/myHtmlResponse.class.php, which
inherits from jResponseHtml. It defines some things:
class myHtmlResponse extends jResponseHtml {

    public $bodyTpl = 'jelix~defaultmain';

    function __construct() {
        parent::__construct();

        // Include your common CSS and JS files here
    }

    protected function doAfterActions() {
        // Include all process in common for all actions, like the settings of the
        // main template, the settings of the response etc..

        $this->body->assignIfNone('MAIN','<p>no content</p>');
    }
}
You see that it defines a template, “jelix~defaultmain” (the defaultmain.tpl
provided by the jelix module, here: vendor/jelix/jelix/lib/jelix/core-modules/jelix/templates/defaultmain.tpl).
We will add later other settings.
This class is declared into the configuration, as the class for the “html” response type.
This is indicated into app/system/mainconfig.ini.php:
[responses]
html=myHtmlResponse
So, when we call $this->getResponse('html') in a controller, we retrieve
an instance of myHtmlResponse instead of jResponseHtml.
Let's back with public $bodyTpl = 'jelix~defaultmain';. You see
there is no need to type the “.tpl” suffix of the file name, because
it is actually a Jelix
selector. A
selector is a string, allowing to easily identify a resource of the project,
independently of its “physical” place.
A selector comprise a module name and a resource name separated by the “~” character, like this: “module_name~resource_name”. The “module_name~” part is not mandatory when this is the current module. The resource name is not obligatorily a file name, even if, most of the time, it is the case. The object which uses the selector (jTpl here) knows how to retrieve the file corresponding to the selector. You will see that the selectors are very often used and allow a certain flexibility and independence from physical paths.
First display 
Let's see now what is displayed by our default controller.
We need of course a web server to run our application. For the demo, let's use the internal web server of PHP, which is very simple to configure. Just execute:
cd new.org
php -S localhost:8080 -t www
Your application is now accessible at this URL: http://localhost:8080/.
Enter this URL in your browser. you should see:
Welcome in your new jelix application

no content
Creating the main template 
We know we have a main template (“jelix~defaultmain”) for all of our pages. As you see in your browser, it's not really what we want.
So let's create a new main template that you'll store into modules/news/templates/main.tpl:
<h1>New.org: all news around the world</h1>

<div id="maincontent">
{$MAIN}
</div>
As we said, the content of this template is only the content of the <body>
element of the web page. So there is no <html> or <head> etc..
{$MAIN} displays the content of a template variable named $MAIN.
So in each action, you should set the content of this variable, which will
be the specific content of the page.
Let's change now our responses/myhtmlresponse.class.php to indicate our
new template:
class myHtmlResponse extends jResponseHtml {

    public $bodyTpl = 'news~main';

....
If your refresh your browser at http://localhost:8080/news/, you'll see the new content.
template for a specific action 
For our first page of the news module, we will define a template. Its content will be assign to the $MAIN variable of the main template.
Create a file newslist.tpl into news/templates/, with this content:
  <h2>Lastest news</h2>
  <p>Section available soon.</p>
Using the template in the action 
Let's modify now the controller news/controllers/default.classic.php,
to add the title and to specify the template of the page.
class defaultCtrl extends jController {

   function index () {
      $rep = $this->getResponse('html');

      // the title of the page
      $rep->title = 'Last news';

      // let's instanciate a jTpl object
      $tpl = new jTpl();

      // assign the content of newslist.tpl to the variable $MAIN
      $rep->body->assign('MAIN', $tpl->fetch('newslist'));

      return $rep;
   }
}
Refresh your browser, and you'll see:
New.org: all news around the world

Lastest news

Section available soon
Or the following html:
<h1>New.org: all news around the world</h1>

<div id="maincontent">
  <h2>Lastest news</h2>
  <p>Section available soon.</p>
</div>
