Trace: • simple-jforms-example
Table of Contents
Simple jForms example for Jelix 
Here is a little tutorial to demonstrate how powerful is jForms, the Jelix form system. This tutorial is compatible with Jelix 1.3 and 1.4.
Create your application 
First, let's create your application. After downloading a jelix archive, extract it to your <jelix folder> of choice. Navigate to <jelix folder>/lib/jelix-scripts/ directory and type in a console:
php createapp.php ../myapp
Don't forget to change rights on <jelix folder>/temp/myapp/. This will allow your web server to create files in this directory (see installation manual for details).
An application skeleton is created. Your local tree structure should look like:
- myapp/
- modules/
- myapp/
- classes/
- controllers/
- default.classic.php
- dao/
- forms/
- locales/
- templates/
- zones/
- plugins/
- responses/
- var/
- www/
- lib/ (Jelix libraries)
- temp/
myapp/ directory contains all files of your application. Note that there is another myapp/ folder in myapp/modules/: by default the createapp command creates a module with the same name of your application. This will be the main module.
Last, copy the content of lib/jelix-www/ into myapp/www/jelix (or you can declare an alias in apache, if preferred).
The contact form 
Now you're going to create a form. The only thing to do, is to create one XML file in the forms/ directory. Call it contact.form.xml. Here is its content:
 <?xml version="1.0" encoding="utf-8"?>
 <form xmlns="http://jelix.org/ns/forms/1.1">

   <menulist ref="title">
      <label>Title</label>
      <item value="mr">Mr</item>
      <item value="mrs">Mrs</item>
   </menulist>

   <input ref="firstname" required="true">
      <label>First name</label>
   </input>

   <input ref="lastname" required="true">
      <label>Last name</label>
   </input>

   <input ref="email" required="true" type="email">
      <label>Email</label>
   </input>

   <submit ref="submit">
     <label>Contact us</label>
   </submit>
  </form>
You can see that it is a declarative format. It is easy to read and edit.
Displaying the form 
Now you're going to display the form. First, modify the default controller, default.classic.php:
 class defaultCtrl extends jController {

    function index() {
        $view = $this->getResponse('html');
        $view->title = "jForms example";
        $view->bodyTpl = 'myapp~main';

        $f = jForms::create("myapp~contact");
        $view->body->assign('form', $f );

        return $view;
    }
 }
On the first line, you retrieve an HTML view (a jHtmlResponse object) with the getResponse() method. Next, you set the title of the page ($view->title).
In the bodyTpl property, you indicate the template to use for the main content of the page (the content of the body tag of a HTML page; HTML header is generated automatically by the view). The given string is called a selector in Jelix. A selector specifies a resource in a module. Its syntax is “moduleName~resourceName”. Here, you simply say that the template will be templates/main.tpl file in myapp module.
Next, in the $f variable, you put an instance of the contact form. jForms creates dynamically a class from the content of contact.form.xml and the static method create() returns an instance of this class. Note that this class inherits from the jFormsBase class.
You pass $f variable to an instance of a template engine (jTpl which works like smarty). It is stored in $view->tpl.
Last line returns $view object and Jelix finishes the job: the view will generate a page based on the given template file, main.tpl.
Let's create this template in myapp/templates/ directory:
 <h2>jForm example</h2>
 <p>Please fill out this form.</p>
 {formfull $form, "myapp~default:save", array(),'','','post'}
It uses the formfull template plugin, which accepts as arguments, a jFormsBase object, and a selector of action. this is the action to be called after a submit on the form.
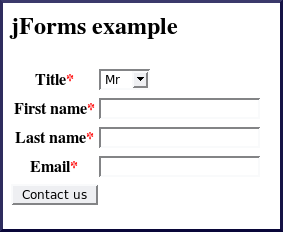
At this step, you can execute the action, http://localhost/jelix/myapp/www/ (or http://localhost/jelix/myapp/www/index.php/myapp/default/index, this is the same thing because this action is the default one of the application), and watch the results:
When testing this form, notice the check done on fields before the submit: some javascript code is generated automatically on this purpose. Anyway, here is the generated html code:
 <form action="/jelix/myapp/www/index.php/myapp/default/save" method="post" id="jform1" onsubmit="return jForms.verifyForm(this)">
 <div></div>
 <script type="text/javascript">
 //<![CDATA[
 jForms.tForm = new jFormsForm('jform1');
 jForms.tForm.setErrorDecorator(new jFormsErrorDecoratorAlert());
 jForms.tForm.setHelpDecorator(new jFormsHelpDecoratorAlert());
 jForms.tControl = new jFormsControl('title', 'Title', 'string');
 jForms.tControl.required = true;
 jForms.tControl.errRequired='"Title" input is required';
 jForms.tControl.errInvalid ='"Title" input is invalid';
 // (snip other javascript code...)
 //]]>
 </script>
 <table class="jforms-table" border="0">
 <tr>
    <th scope="row">  <label class="jforms-label jforms-required" for="jform1_title">Title</label> </th>
    <td> <select name="title" id="jform1_title" size="1">
              <option value="mr">Mr</option>
              <option value="mrs">Mrs</option>
         </select></td>
 </tr>
 <tr>
     <th scope="row"> <label class="jforms-label jforms-required" for="jform1_firstname">First name</label> </th>
     <td><input type="text" name="firstname" id="jform1_firstname" value=""/></td>
 </tr>
 <tr>
     <th scope="row"><label class="jforms-label jforms-required" for="jform1_lastname">Last name</label></th>
     <td><input type="text" name="lastname" id="jform1_lastname" value=""/></td>
 </tr>
 <tr>
    <th scope="row"><label class="jforms-label jforms-required" for="jform1_email">Email</label></th>
    <td><input type="text" name="email" id="jform1_email" value=""/></td>
 </tr>
 </table>

 <div class="jforms-submit-buttons">
    <input type="submit" name="submit" id="jform1_submit" class="jforms-submit" value="Contact us"/>
 </div>
 </form>
Note also that form elements have CSS classes or IDs assigned to ease their design.
The formfull plugin generates the form in an HTML table. Of course there are alternatives. By using other plugins, Jelix allows you to control precisely the html generated. Let's change that in the main.tpl file.
 <h2>jForm example</h2>
 {form $form, "myapp~default:save", array(),'html', array('method'=>'post')}
  <fieldset>
     <legend>Please fill out this form:</legend>
     <dl>
      {formcontrols}
         <dt> {ctrl_label}</dt>
         <dd> {ctrl_control} </dd>
      {/formcontrols}
      </dl>
   </fieldset>
   <div> {formsubmit} </div>
 {/form}
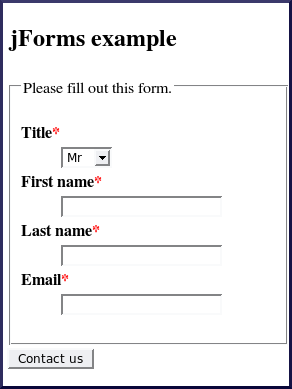
The template above use the form plugin instead of formfull. Its arguments are identicals. The formcontrols plugin do a loop over the fields declared in the contact.form.xml file (except submit and reset controls), and you can display the label and the field with ctrl_label and ctrl_control. formsubmit displays all submit controls.
Here is the result of this template :
Handling submitted data 
Now you're going to create the action method indicated in the arguments of the form plugin. In the templates above, it is called 'save'. Add this method in default.classic.php.
    function save() {
        $view = $this->getResponse('html');
        $view->title = "jForms example : end";

        $f = jForms::fill("myapp~contact");
        if(!$f || !$f->check()) {
            $view = $this->getResponse('redirect');
            $view->action="myapp~default:index";
            return $view;
        }

        $view->bodyTpl = 'myapp~contact_ok';
        $view->body->assign('form', $f );
        return $view;
    }
To get the instance of the form, and by the same time to fill it with submitted data, use the fill() method. Then, test if this instance doesn't exist (!$f) or if there are bad data (!$f->check()). If this is the case, make a redirection to the first action (displaying the form). The form will be displayed again with error messages included: this is automatic! However, you should change slightly the index method. Replace $f = jForms::create("myapp~contact"); by
    $f = jForms::get("myapp~contact");
    if(!$f)
       $f = jForms::create("myapp~contact");
Instead of just creating a new instance of the contact form, check before if there is an existing one. So HTML fields will be filled with datas previously submitted (and saved in the session).
Back to save() method. After the $f->check(), you could insert some business code (not shown in this tutorial). For example:
    if(!$f || !$f->check()) { ... }

    $alldatas = $f->getDatas();
    // or
    $firstname = $f->getData('firstname');
    if ($firstname == 'E.T.') {
        /* goto home */
    }
    // and so on.
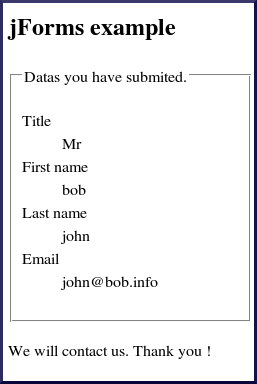
Finally, you could display submitted data and thanks the user. Here is the contact_ok.tpl file:
 <h2>jForm example</h2>

  <fieldset>
     <legend>Data you have submitted.</legend>
     <dl>
      {formcontrols $form, array('title','lastname','firstname','email')}
         <dt> {ctrl_label}</dt>
         <dd> {ctrl_value} </dd>
      {/formcontrols}
      </dl>
   </fieldset>

  <p>We will contact you. Thanks!</p>
Use again the formcontrols plugin, but in a standalone manner (not with a form plugin). Indicate as arguments your form object ($form), and the list of controls to display (those are optional).
Conclusion 
That's all! It is really easy to use jForms, isn't it? You can:
- create a form
- display a form
- retrieve submitted data
- validate submitted data (this is done automatically !)
- display the form again with errors
With only one xml file and few lines of code!
And jForms has many other features, such as:
- create your own form “builder”, so plugins could displays the form, not in HTML, but in other format like Xforms, XUL, or in HTML + your prefered ajax library.
- specify your own error messages
- localize everything
- manage how error messages are displayed
- display helps and tooltips
- fill menulist, listbox, (and so on) choices automatically, using a
jDaoobject (ORM layer of Jelix) - read and store data automatically still using a jDao object
- create quickly a CRUD controller, by using the
jControllerDaoCrudcontroller (only indicate a jforms file, a jdao file, and that's all !) - and many other controls are availabled: <textarea>, <htmleditor>, <wikieditor>, <captcha>, <listbox>, <checkbox>, <checkboxes>, <radiobuttons>, <reset>, <secret>, <secret>+confirmation, <upload> etc…


